

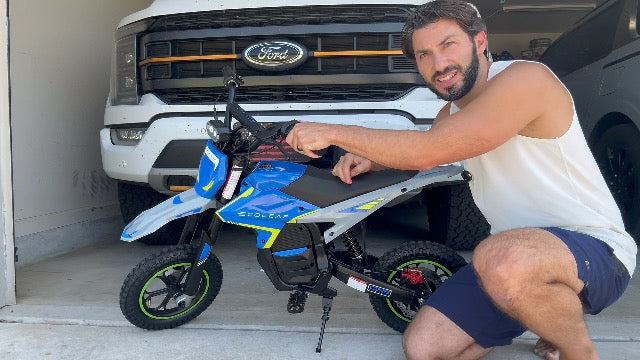
Off-road riding can help children build balance, coordination and confidence, but a safe session starts before the bike moves. Parents should check the rider, protective gear, bike, terrain, weather and emergency plan before every ride—not only on the first day.

1. Check the rider first
A technically sound bike is not enough if the child is tired, distracted, upset or overexcited. Ask the rider to repeat the session rules and demonstrate how to close the throttle and apply the brake before powering the bike. A child should be able to balance independently, reach the controls without stretching and support the bike when stopped.
2. Inspect all protective gear
Use a properly fitted helmet intended and certified for motorized off-road riding. The helmet should sit level, feel snug without painful pressure points and remain secure when the child shakes their head. Replace a helmet after a significant impact and follow the manufacturer’s replacement guidance.
- Eye protection that remains clear and secure
- Full-finger gloves with good grip
- Long sleeves and durable long pants
- Knee and elbow protection
- Over-the-ankle boots or sturdy riding footwear
- Chest and back protection when appropriate for the terrain and speed
3. Perform a pre-ride bike check
Inspect the bike while it is powered off and on stable ground. Squeeze the brake and push the bike to confirm that braking resistance feels normal. Turn the handlebar from side to side, check that the throttle moves smoothly and returns immediately when released, and look for loose controls or damaged grips.
- Check tire condition and pressure according to the owner’s manual.
- Confirm that wheels rotate normally and axle hardware appears secure.
- Inspect the brake, lever, cable or hose for damage.
- Look over the frame, fork, rear suspension and fasteners.
- Check visible wiring, connectors and battery mounting.
- Confirm the battery has enough charge for the planned session.
Do not ride with unusual noise, heat, damaged wiring, a sticking throttle, weak braking, a loose wheel or fluid leakage.
4. Walk the riding area before the child rides
Conditions can change between sessions. Walk the complete route and remove branches, wire, glass and loose debris. Mark or avoid holes, hidden rocks, deep ruts, mud, standing water, exposed roots and sudden drop-offs. Keep beginners far from roads, driveways, vehicles, pedestrians, pets, pools, fences and steep slopes.
Start on flat, open private property or another permitted area with enough room to accelerate, turn and stop. Check local land-use, noise and vehicle rules before riding.
5. Match speed to skill and conditions
Use the lowest available speed mode for a new rider, a new bike or an unfamiliar surface. For the Ecoleap K2, that means beginning in the 10 mph mode rather than unlocking 15 or 20 mph simply because those settings are available. A higher mode should be earned through repeatable control, not age or enthusiasm.
Increase speed only after the child can start smoothly, hold a line, roll off the throttle, stop inside a marked box, turn both ways and obey the stop signal. Return to the lowest mode when conditions worsen or the rider tires.
6. Set boundaries and communication rules
Explain the riding boundary, direction of travel, passing rule and no-go zones before powering the bike. Agree on one clear stop signal that can be seen or heard over normal riding noise. The child should stop immediately when the signal is given, even if nothing appears wrong.
An adult should maintain a clear view of the riding area. Separate beginners from faster riders and limit the number of bikes on the course.
7. Prepare for weather and emergencies
Check heat, cold, rain, wind and daylight. Hot weather increases dehydration and can affect battery and motor temperature; cold conditions can reduce battery performance and tire grip. Stop for lightning, poor visibility, heavy rain or a surface that has become too slippery to control.
Keep water, a charged phone and first-aid kit nearby. Know the address or trail access point in case help is needed.
8. Watch for stop-riding signals
End the session when the child begins missing turns, grabbing the throttle, braking late, staring at obstacles, ignoring boundaries or repeatedly dropping the bike. Also stop for pain, dizziness, overheating, damaged gear or any change in the bike’s sound or handling. Fatigue often appears as sloppy control before a child admits feeling tired.
9. Complete a post-ride check
Let the bike cool, then inspect it for new damage, loose parts, embedded debris or abnormal heat. Clean it only as directed in the owner’s manual and never charge a wet, damaged or unusually hot battery. Charge and store the battery using the supplied equipment in a dry, ventilated location away from flammable materials.
Quick parent checklist
- Rider is rested, focused and able to control the bike.
- Helmet and protective gear fit correctly.
- Throttle, brake, tires, wheels, controls and battery pass inspection.
- Course has been walked and hazards removed or marked.
- Speed mode matches the rider and current surface.
- Boundaries, direction and stop signal are understood.
- Adult supervision, water, phone and first-aid supplies are ready.
Frequently asked questions
How often should a kids’ dirt bike be inspected?
Do a quick inspection before every ride and a post-ride check afterward. Follow the maintenance schedule, tire-pressure guidance and fastener checks in the specific owner’s manual.
Can an experienced child ride without adult supervision?
Children still need responsible supervision appropriate to their age, judgment, bike and environment. Experience reduces some beginner errors but does not remove hazards such as mechanical failure, other riders or changing terrain.
Is grass the safest surface for beginners?
Short, dry and level grass can work, but wet grass is slippery and tall grass can hide holes or debris. Smooth hard-packed dirt often provides more predictable traction if the area is flat and clear.
Choose a bike the child can control
Safety begins with fit. Compare the Ecoleap K1 and Ecoleap K2, or read our kids’ electric dirt bike buyer’s guide. Choose by height, leg reach, control access, bike weight and skill—not age or maximum speed alone.
Safety note: Rider readiness varies. Product speed and range can change with rider weight, terrain, temperature and riding mode. Kids should ride off-road only in permitted areas under responsible adult supervision. Follow the owner’s manual and local rules.


Share:
Training Wheels vs. a Pre-PW50 Electric Dirt Bike: What Parents Recommend
Best Electric Dirt Bike for a 7-Year-Old: Parent Buying Guide